Tuesday 31 December 2013

1st ever attempt at Magnetic!

Seeing as it's going to be the party night of the year this evening, I wanted to post to you guys something fun and sparkly and magnetic nail varnish fits the bill. It's definitely different and really shimmery. I decided to start with a named brand such as the lovely Sally Hansen seeing as trying with cheap ones probably wont work as they aren't as good a quality. I will let you into a little secret though... this was purchased at the £1 shop again! Just to say this will probably be quite looooooooooong seeing as it's partly a tutorial and there's many photographs - sorry!
So here's the varnishes with a lovely backdrop which is quite Christmas-y colours :) It's the Base & Top Coat by Barry M and Magnetic Nail Colour in Silver Elements by Sally Hansen. So here is my step by step tutorial to using the lovely magnetic nail varnishes, the only thing I'd say beforehand it's basically practise makes perfect. Don't be disappointed like me when it wasn't perfect the first time...

Step 1. Apply the first coat thinly and evenly.


Step Two. Apply a second coat, you may skip this step if you feel you don't need to but I did seeing as the one coat wasn't opaque enough to cover the nails.

Step Three. As I am basically a child and enjoy applying crackle effect to nail, this step was a great step as well as it's really cool to watch happening to your nails. This is when you apply a thick coat of nail varnish then immediately after place the magnet above the nail. (You have to do them one at a time.)
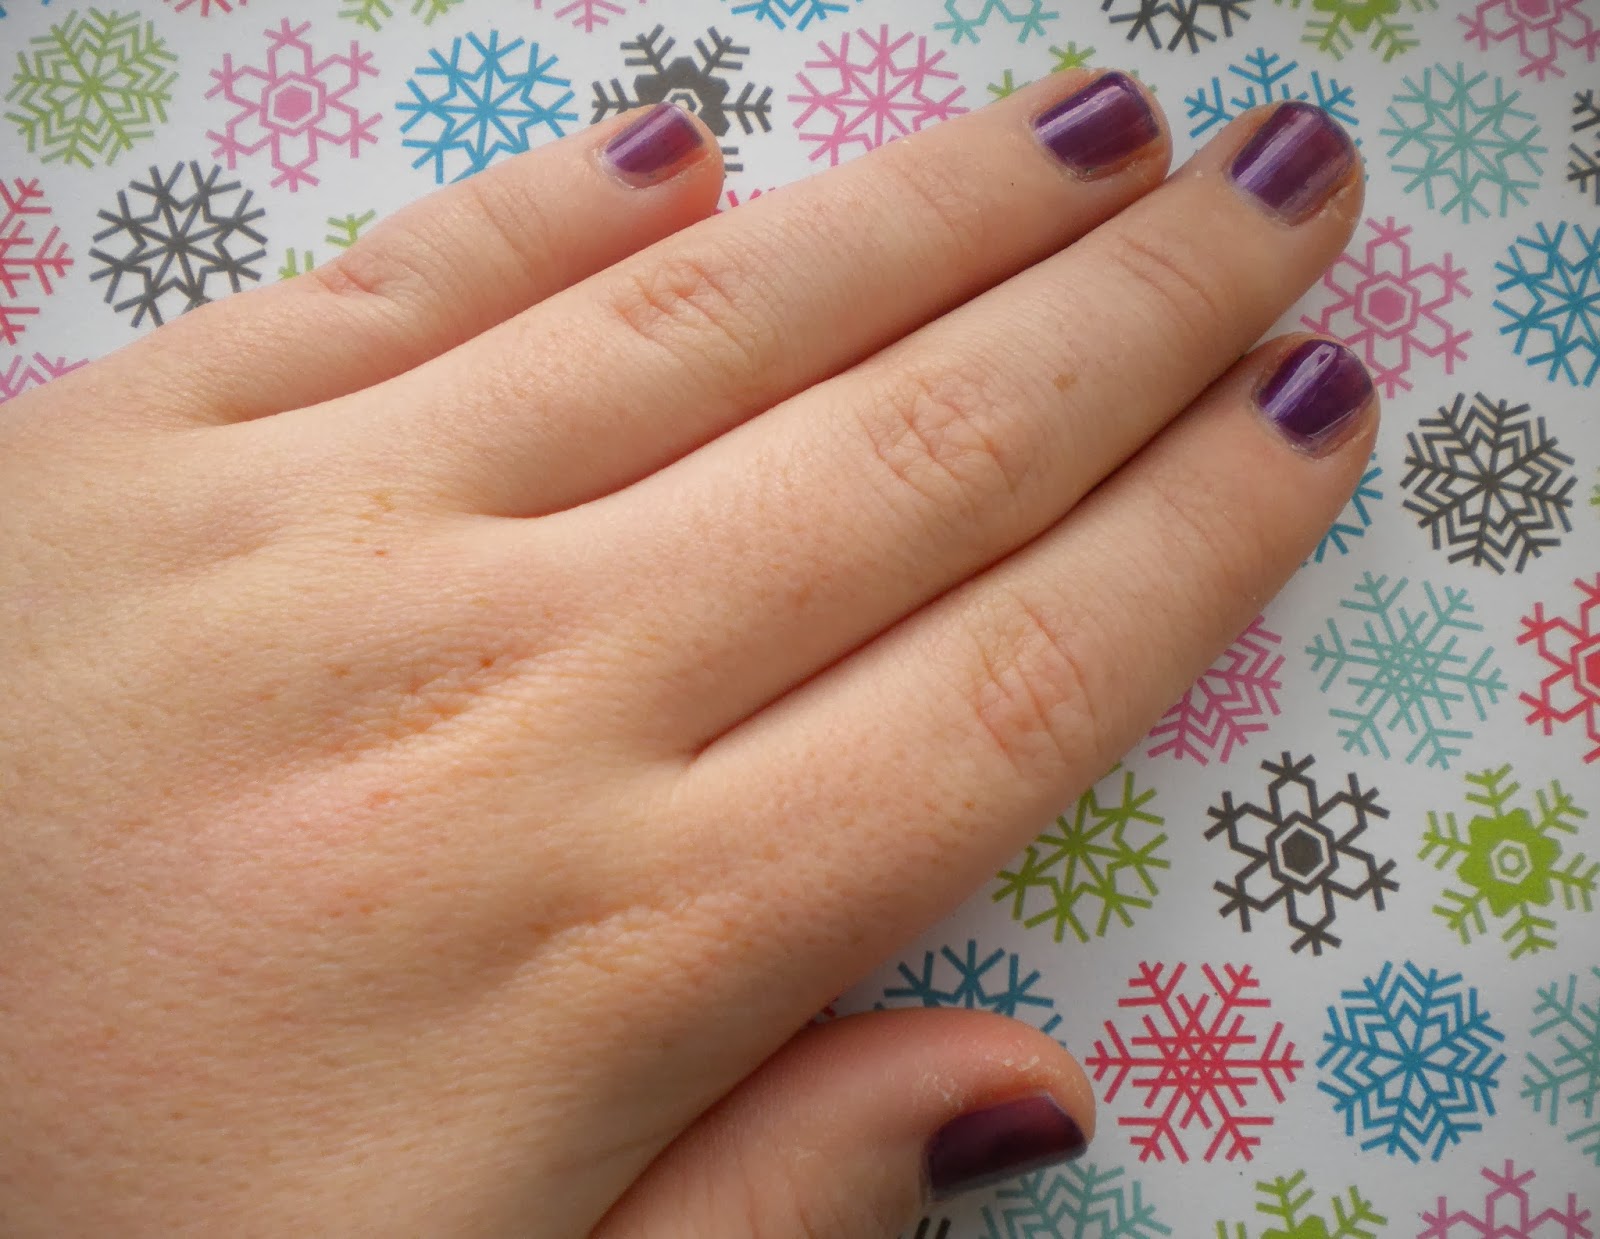
Being one of those people that thinks they know everything, I didn't read the instructions before doing this so I only applied a thin coat of nail polish meaning they didn't come out well as seen here:


Only two fingers had the desired effect so warning to you guys read the instructions first on the nail varnish effects to get it correct on the first attempt (I now had to read do my nails at this point as I was naughty and didn't listen to instructions...)
 
Step Four. Apply top coat.


Step Five. Relax and enjoy your nails, they look amazing! I'd recommend this brand of magnetic nail varnish as it was really easy to do and get the magnet to work it's magic. Also a Happy New Year to you lovely readers.


Sunday 29 December 2013

From disaster to a miracle...

Yesterday loads and loads of family were invited to my little house for a little Christmas gathering including some smallish children. The nail polish collection was brought out to give the extended family manicures which my young cousins love! With that amount of people in a small space like sardines in a tin would probably mean something was going to be broken...
Sadly the nail polish collection's tin was knocked over meaning cracking polishes inside.  One of the casualties was recently accumulated Berry Juicy by Sally Hansen and Shatter the Scales by OPI which I have quite enjoyed recently so much so I showed you guys. Once tided up and rest recovered, today I decided to see if I could replace them. This is quite a quest seeing as once out of stock in a £1 shop they are gone forever! ... The colour has been replaced by the £1 shop however not the same brand, so here's the review of it.
The replacement is Porcelain Pink by Maybelline Forever Strong Pro in addition to the normal Base & Top Coat by Barry M (which has now got a green tinge because of the breakages.) The application of this lovely pale pink does sometimes top the Sally Hansen nail polish as it's very pigmented but applies evenly across the nail when done correctly which I found out. It dries relatively quickly and stays the strong colour which it has when applied, but still needs a second coat sadly.


There's the first coat done and second is to follow now. The second coat definitely makes the nails really great as it fills out all the little gaps and see through bits meaning it's complete covered opaque nails which is always a plus! Here they are:


Lovely! I think I may be able to survive the loss of a nice nail polish as this one may replace it well. At the same time at this lovely purchase, another nail polish was purchased a Sally Hansen Magnetic nail polish but that's the only clue you'll get.

Friday 27 December 2013

Sister's Party Nails - A Lovely Teal.

Seeing as my lovely sister found out about my blog today, she wanted to become a nail polish model for me - which is really good seeing as she has way better nails than me! As my sister is going to a party tomorrow, the colour nail polish was chosen due to the fact it'll colour match her outfit. I like them so much on her, I want to take of my nail polish and put this one on...


It's Rimmel Pro again - Ooops! It looks like I've been on a Rimmel Pro shopping spree but I promise I haven't. The colour is 381 Jade Green with additional Base & Top Coat by Barry M. Colour-wise Jade Green is more blue in colour than bright green personally which is a good thing. No shimmer or matte, just plain colour for a change.

So sorry about the lighting, these were taken in the evening meaning not brilliant lighting in the little house. Application was good, made use of the wide brush supplied with the varnish. Even coverage most of the time with a few teeny tiny streaks. However it does dry fairly quickly, this being the first layer as it's not completely opaque another layer and top coat needs to be added.


Much better colour and coverage (and much better lighting for you guys.) Therefore brilliant nail polish so far, I've just consulted my sister with her manicure and apparently it doesn't chip bearing in mind she's been trying to chip it to test it out. As I have probably said previously is that this collection is a definite recommend as the application and wear is brilliant. And finally the colour is lovely especially on my sister's nails who was a fab nail polish model...

Thursday 26 December 2013

A lovely christmas present review.

Hello! Hope you all had a Merry Christmas! Today being the day after Christmas, I thought you'd all like something to entertain you for a few minutes so I am going to show you two of my brilliant presents in order to create this lovely nail effect. I am not bragging either! Here we go...
These are the varnishes I have used to create these nails; Berry Juicy by Sally Hansen, Base & Top Coat by Barry M and SNP1 White by Barry M. There are two colours due to the fact that SNP1 White was tried out by itself, then realising that it's an effect therefore not good enough coverage by itself. So a base colour was chosen.
First base coat completed. On to the next as it's really needed to make the colour shine through.

Right now that the base coat is completed the effect is going to be put on top. As for reviewing Berry Juicy by Sally Hansen, it's a brilliant light pale pink but it's held back by the fact that you need three coats as it can come out a bit streaky when just one or two coats. The application is lovely goes on easily! Therefore good nail polish if you have the time to apply it. 


The fun part - adding the effects on top of it! Anyone who knows me, knows that I love glitter on top of the colours. This effect was a range of colour sequins in a light white colour polish that doesn't really show up by itself but is great to put on top of others. Colours of the sequins include; green, yellow, red, blue, silver and gold. Luckily this means you can put it with any other colour!!! I am just too excited by this fact. So I'd definitely pick this nail effect for painting your nails if you're going out to a Christmas party, meeting up with friends or just because you love glitter nail polish like me...

Tuesday 24 December 2013

Purple Addict - Definitely!

Throughout my later childhood the colour I wore about 90% of the time was ... Purple. This nail varnish sums up my love of the colour as it's dark enough yet also has a metallic shimmer which is always a plus. The name of the varnish by Rimmel Pro is 406 Purple Addict which means it has a lot of expectations to fill especially for me!
Luckily for me, this nail varnish has a maxi-brush which can be seen on the top of the lid,  this makes it really easy to apply your nail varnish and get neat lines along the bottom of your nail. The other types of nail brushes don't get as good a result when I use them... The Application of the nail polish was simple; not gloopy at all, even thickness and no streaks when I painted the nails. Here's the first coat of the nail polish. p.s. I apologise in advance for the not great state of my hands at the moment... 
 
The first layer was a great purple colour yet it looked quite transparent on the nails as you can still see the nails underneath - which I am trying to hide. Therefore another coat was definitely needed to get the best results out of the amazing colour.
 
A much better result for the nails. Two coats is the best solution for this nail varnish. I haven't worn them all that long so I can't give you guys a review if this particular nail varnish chips but the Rimmel Pro collection I have tried and it definitely stays on for a while without chipping at all so fingers crossed for this one. It also comes off without any markings, so you can repaint your nails afterwards without any showing up. If you're a purple addict, this will calm your addiction to the colour as it's so nice. It has calmed mine!


Monday 23 December 2013

Sally Hansen Co-Bolt Blue - A Recommend!

When I saw this colour I just knew I had to have it seeing as it's navy blue and metallic at the same time which is a combination of my favourite things! This was purchased in a £1 shop so I am not sure if it's either readily available in the UK or any where else for that matter... (Just did a quick search and you can get this lovely colour on Amazon.) It's a very dark colour itself yet the metallic element to the colour lifts it slightly so that it isn't mistaken for a black or a dark colour.
The applying of this nail polish was really simple! It went on smoothly with no large streaks or blobs that were visible to the eye therefore it was even. This was in a well lit room making it very easy to do but it wouldn't be hard in a normal room either. With the name of the range insta-dry I was expecting it to dry quickly but not that quickly! That was amazing! Finally it was enough coverage in the first layer to leave it as is. It came out in the first layer as if you had done about three. So a definite brand if your just quickly applying one coat and going. Here's the pictures...
 
 
That was just with the one coat, I decided to have a play and see if it looked even better with two coats but it my opinion it didn't make a huge change just more coverage overall.
 
They created a great coverage across the nails and the colour was amazing, so this could mean to the downside of either taking forever to come off or staining your nails when you did take it off. So I tested this by using nail polish remover to take them off and surprisingly they came off without any hassle at all! BRILLIANT! So all thumbs up from my review so far for this lovely nail polish. If you can find it near you or order it online, I'd definitely recommend this colour if your a navy fan or if you like convenient nail polishes. 

Saturday 21 December 2013

Another nail polish shopping spree - in the £1 shop...

Here I am again talking about the wonders of the £1 shops in England seeing as I have splurged in them recently - slaps own hand. But it's another one of those incidences that I so say couldn't help myself from buying them seeing as they only cost £1 whereas they normally retail at around £6.49. So do you want to see the loot I got? Here you go and also whilst I am doing so I'll show you the packaging they came in so it gives you guys a heads up. :)
Obviously I realise that these products are reduced due to the fact that the brands have new lines out, yet they are still perfectly as good! Also I am by no means bragging about the stuff I have. I just think that showing you this and the packaging will help you guys find your own. These OPI nail crackles (Red Shatter and Shatter the scales) have already been featured, being really good and easy to create different thicknesses of the crackle meaning more effects. These were packaged in clear plastic bags which they were going to be shown in but I lost them (I am very clumsy!)
Another well known brand, Sally Hansen! These colours aren't exactly this seasons colours but this seasons colours wouldn't be at a £1 each. All of the nail varnishes will be officially reviewed for you lovely people, they have been tried and they give good coverage and colour. The package was clear with cosmetics text at the top, when buying these I looked like a member of staff seeing as the whole stand had to be rearranged to get the great colours - Berry Juicy and Lacey Liliac.
I have found the Rimmel Pro varnishes before in other shops as they were really great to put on your nails seeing as they went on easily - not gloopy and very even, therefore I jumped at these when they were in great colours. These colours are Jade Green and Purple Addict (I am definitely am one!) These came in the annoy plastic packages that you have to cut open but still had their own label so quite easy to spot. In addition to this is a load more Sally Hansen in another older design of packaging but brilliant colours (haven't tried them yet...) Colours are In Record Lime and Co-Bolt Blue which is very metallic. Similar plain packaging to these...
 

I have to admit that I believe one of these nail varnishes is going to be a mistake... These are all Revlon nail varnishes mostly bright colours seeing as I am an addict to bright colours! They are; Emerald City, Sweet Tart, Siren and Zealous. However Emerald City says on the front "Matt suede" so I am not sure what it's going to come out like. Oh well it was a £1...
Last but not least, nail brushes for when your cleaning and pampering your nails beforehand. I will try and hopefully get a shot of the cosmetics in my local £1 stores to show you even further but I can't promise anything as they might think it's a tad weird. :) 

Thursday 19 December 2013

Getting into the spirit of things: Christmas Crackle!


Seeing as the lovely red and gold theme Christmas tree has now been put up inside the house, definitely going to beat all the other Christmas tree designs just kidding! It's now the time to get into the festivities therefore the nails should be also. After a few attempts at deciding a good colour combination I copied the tree colours - red and gold. However seeing as I am so addicted to crackle at the moment, the red is going to be crackle!
It's a combination of Gemey Paris by Maybelline New York and Red Shatter by OPI. The gold is definitely a mute gold as opposed to a bright gold so that it lets the red stand out and also so my fingers don't look too much like a bright Christmas tree...
Layer number one: Good so far! Definitely needs another coat as it's quite see through at the moment.
Layer number two: Okay-ish coverage, it's fine seeing as the crackle layer is going on over the top but sadly you'd need another layer or possibly two if your just wearing it as it is. Therefore the nail varnish doesn't get a total thumbs up.
Here's the final results! And another shot of the Christmas tree. Overall it came out pretty well, the OPI nail varnish was lovely to apply seeing as at one point too much nail polish was applied yet it didn't come out in one big blob (which does happen with less expensive nail varnish effects) also the under coat colour complimented the crackle effect! Therefore this combination has a thumbs up and a definite recommend of the OPI red shatter effect. Finally Merry Christmas!!!


LinkWithin

Related Posts Plugin for WordPress, Blogger...